How to Rebuild a RK 56

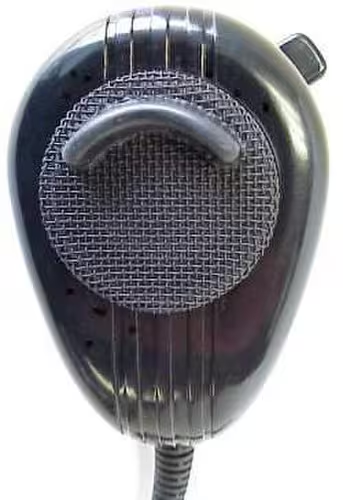
I know I’ve said this ad nauseum, but the best mic ever made for the trucking industry was the OLD Telex Road King 56 mic. I know some will bitch on how they had to take a ballpoint pen spring and “fix” the switch on the damn thing, but hey, the audio was unmatchable. The reason for this was the mic element. They stopped making that element when they got taken over, and the newer ones are just not the same. But go looking in the shop, in an unlabeled box, on the bottom of the shelf, and you will find an old one, or maybe 3. I said this to John “it’s what we do” Barnwell, and he called me right back laughing, he had 3. I rebuilt them and then thought I might as well tell you guys on how to do it.
Parts List from Amazon: around $36 total
Replacement MIC CORD-6wire-Workman MIL10
RoadKing RK56 Microphone replacement Slide Switch
CB Mic Plug 4 pin female
If you can solder, you can do this. You don’t have to know any color code because you are going to make your own. Or you can take a picture and match up the switch to the plug. All you need is an understanding of the operation. Remove the back 5 screws and you’ll see the switch. I’m showing one removed and a naked one to explain the operation. Basically, it’s a 6 pole, single throw switch.


With the mic just sitting there, Rx(receive) is making contact with G(ground). Most radios do not need this, but to work in a Cobra 29, it is necessary to ground out the Rx to complete the circuit. Nothing else is happening.
When you press the PTT(push to talk button), Tx makes contact with the first G(ground) and results in the radio transmitting. Now for the audio side of things. The second G(ground) then makes contact with Y to close the audio circuit.
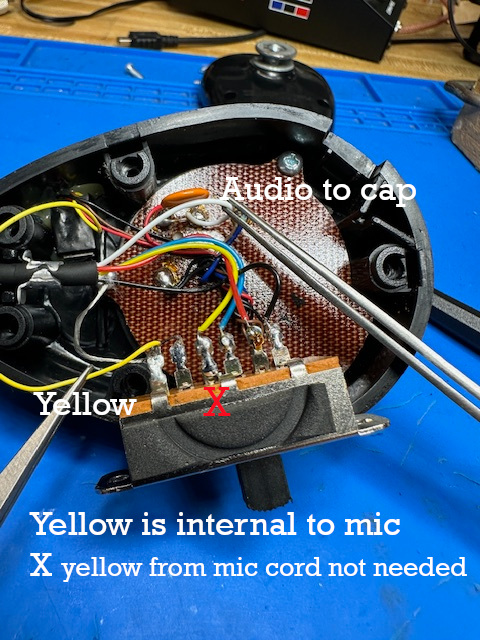
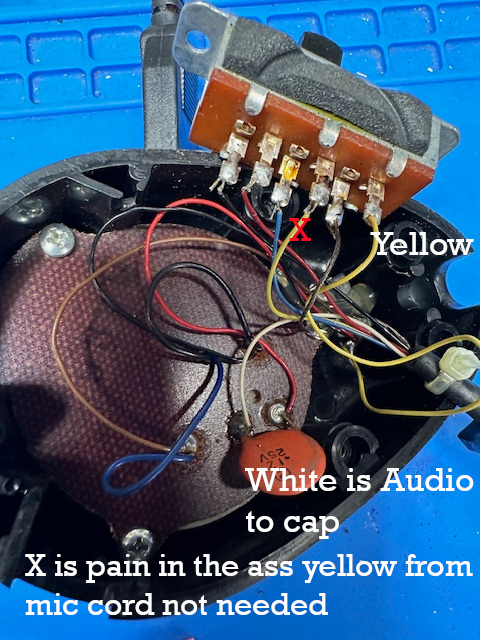
Y is an internal audio line in the mic that we’ll see next. Stay with me and it will all come together. Pictures are worth a thousand words. The wiring we are dealing with here is the mic cord with the exception of the Y which is internal to the mic.


Remove the Old Shit
Pay attention to the way the switch is oriented, take a picture because you might end up doing it backwards. The switch will have the mic cord wires attached EXCEPT the last pin that has the Yellow internal wire. Remove this one. Now on the board, remove the white (or whatever color some psycho decided to use) from the cap. The whole switch and cord can now be removed.
New Shit
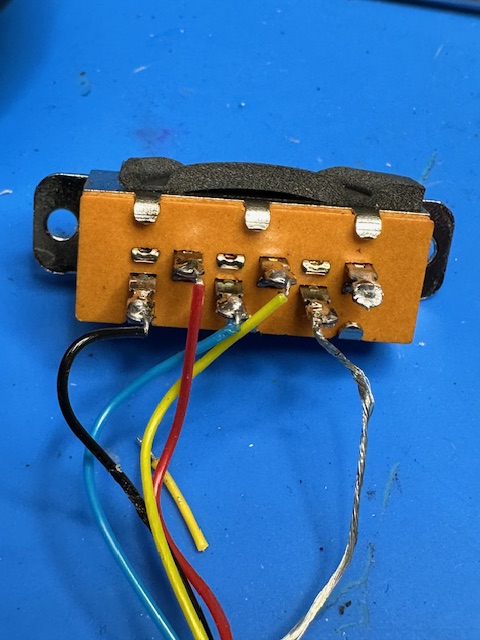
The mic cord will have 6 wires, Red, Black, Blue, White, Shield, and the not needed Yellow.
For me, I like wiring things this way because it just makes sense to me. Moving from left to right on the switch:
Pin one, Rx, Blue mic cord wire.
Pin two, G, Black mic cord wire.
Pin three, Tx, Red mic cord wire.
Pin four, NC, you’ll find a yellow from the mic cord, but it’s a cut it and forget it.
Pin 5, G, shield
Pin 6, Y, internal yellow wire.
White, Audio, goes to cap on the board.
Now understand, you can use any color code you want, you just have to match it up to the plug end. All modern 4 pin radios are all wired the same. Some old shit (that you should not have it a truck because you need reliability, might not be, but don’t get me started on this).
Now understand, you can use any color code you want, you just have to match it up to the plug end. All modern 4 pin radios are all wired the same. Some old shit (that you should not have it a truck because you need reliability, might not be, but don’t get me started on this).
Mic Plug:

Pin 1 Ground
Pin 2 Audio
Pin 3 Tx
Pin 4 Rx
Based on our switch wiring, our color code is now:
Pin 1 Ground – Black & Sheild
Pin 2 Audio – White
Pin 3 Tx – Red
Pin 4 Rx – Blue
Pin 1 will get 2 wires soldered to it, Black & Shield.
The mic plug will be numbered on its face, look at the picture, just be aware that you will be working on the back side. Look at both sides and you’ll get what I’m talking about, (clockwise face, counter back side) (I refuse to say anti-clockwise, fuk that).
I tin up the mic plug terminals then make my connections.
Take your time, you don’t need a lot of heat and have at it.
The mic cords I recommended have strain reliefs for both ends. The mic housing end fits perfectly, but sometimes pretty snug, just make sure the back cover sits completely closed. With the plug end, I combine the black and shield in a small piece of heat shrink because I’m anal. Also, the plug will come with a sheathing to cover the solder points, don’t be an asshole and throw it out. It’s not extra parts. It’s going to prevent any possible shorting out.
If you have any issues, not mental ones, mic ones, email me and I’ll do my best to help.